How to install Windows 7 on ZBOX Mini PCs with Intel Braswell or Skylake?
BI322 (64-bit)
BI323 (64-bit)
CI323nano (64-bit)
MI551 (32-bit/64-bit)
MI525 (32-bit/64-bit)
Installing Windows 7 32-bit/64-bit
In prior generations, PC systems had both xHCI and EHCI controllers. Intel removed the EHCI controller from Braswell and Skylake platforms which made installation of Windows 7 more difficult on these platforms. Windows 8 and 10 currently do not have any issues for a fresh OS installation via xHCI controller, but Windows 7 does not natively support xHCI controller and relies on manual installation of the Intel's xHCI driver.
Before proceeding, confirm whether or not that the ZBOX Mini PC can support Windows 7 32-bit and or Windows 7 64-bit.
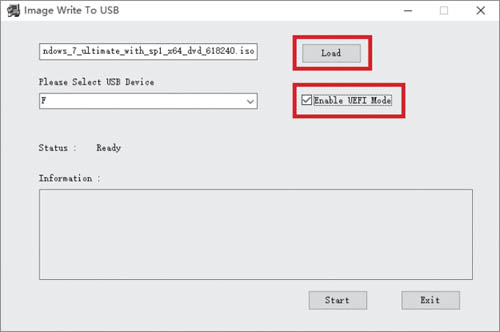
For users who want to install Windows 7 32-bit/64-bit, you will first need to prepare a USB Flash Drive and to do so you will need to run the Win 7 tool to load the Windows 7 32-bit/64-bit image into a USB flash drive (above 4GB) before its installation. The Win 7 Tool will need to be ran on a system with Windows Vista and above operating sytsem. Please follow the instruction as below:
1. Convert the Windows 7 32-bit/64-bit DVD into an ISO image.
2. Load the Win 7 tool at X:\Win7_Tool\Image To USB.exe (X: your driver disk letter). If you want to use UEFI mode, check the box before “Enable UEFI Mode”. Grab the latest version online at zotac.com under support
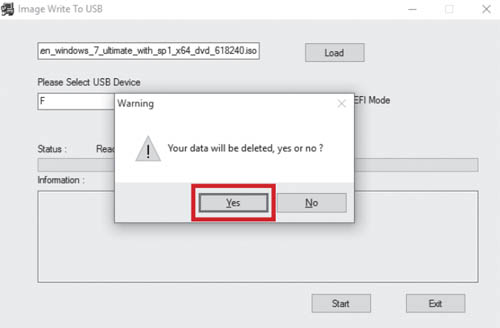
3. A warning pop up will appear, warning “Your data will be deleted, yes or no?” Click “Yes”.
4. When completed, click “Exit”.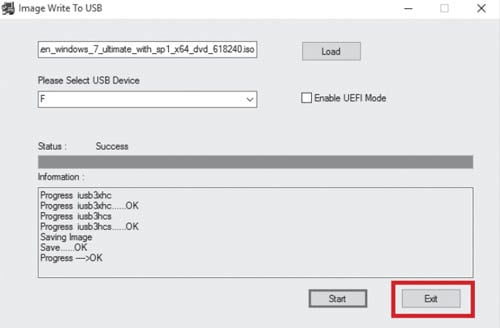
5. End

Open Apps wechat and Scan the above QR code.