
A Quick Guide to FireStorm
2019.09.09 1:00 AM
Hello new users!
You are in the right place if this is the first time you've ever owned/used a ZOTAC/ZOTAC GAMING graphics card and would like to know how to get the most out of your card. Read on to learn more about our fine tuning software - FireStorm, because the more you learn, the better you can get the most out of your graphics card and gaming experience. Let's begin!
DOWNLOAD FIRESTORM
First, make sure you have installed the latest version of the FireStorm software on your computer:
- For owners of ZOTAC GAMING GeForce RTX 40 Series
- For owners of ZOTAC GAMING GeForce RTX 30 Series
- For owners of ZOTAC GAMING GeForce RTX 20 Series & GTX 16 Series
- For owners of ZOTAC GeForce GTX 10 Series & GT Series
YOUR GPU SETTINGS
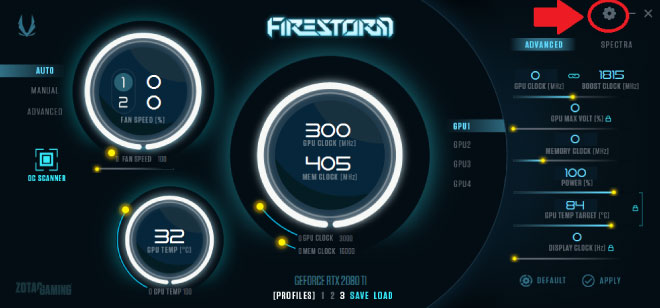
Open FireStorm to see the latest modern and simplified UI. It's easier if we visualize it into 3 colored zones:
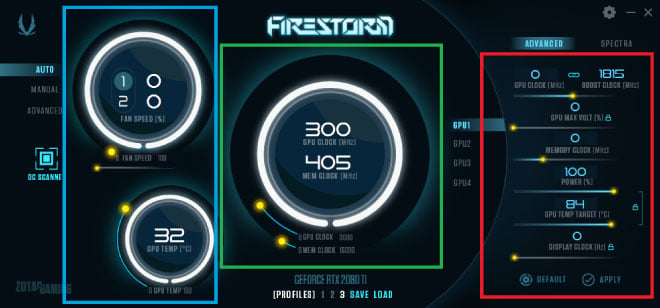
The green zone (middle in the image) displays GPU (top) and Memory (bottom) clock speeds.
The blue zone (left in the image) displays GPU temperature, fan speeds and fan speed adjustments.
And the red zone (right in the image) is the adjustment area we’ll need when trying to extract more performance.
ADJUSTING FAN PROFILES
To adjust your fan profiles, we have AUTO (default), MANUAL, and ADVANCED tabs.

AUTO is the default setting out of the box.
Selecting MANUAL allows you predefine the fan speed (in %) of the graphics card. It will tell the fans the speeds to run at, at all times, regardless of the temperature of the graphics card.
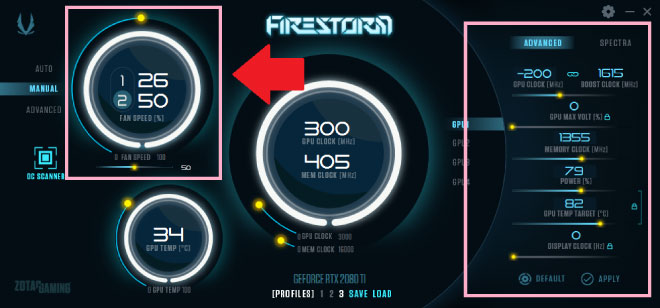
On the pink box on the left, you can take advantage of Active Fan Control (if model is supported) function available in RTX models which allows you to set individual fan speeds for each fan. For graphics cards with three fans, the left and center fan will be grouped as 1 and the right fan is group 2.
If Active Fan Control is available on your graphics card, you’ll be able to select Group 1 or Group 2 and make adjustments else the group 1 and 2 will be greyed out and not selectable. Select the Group (if available) and then slide the slider bar to the right or left to the preferred fan speed percentage. It will automatically apply your settings.
FINE TUNING
On the right is where you will be able to make adjustments on your GPU clock, GPU voltage (if not locked), Memory Clock, Power, GPU Temperature Target, and Display clock. You can also unlock GPU voltage, Power, Target Temp and Display Clock by clicking on the “lock” icon.
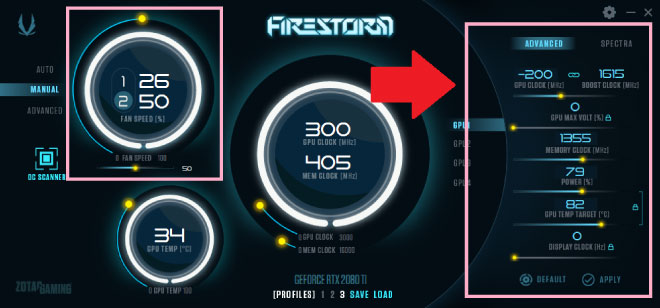
But remember, the overclocking performance differs depending on your graphics card's model and silicon lottery. You can always start tweaking by trying to increase the memory clock in small increments. But if you push too far, the card or the system could crash or become unstable. So always take little steps, and test again and again for the optimized result you are looking for.
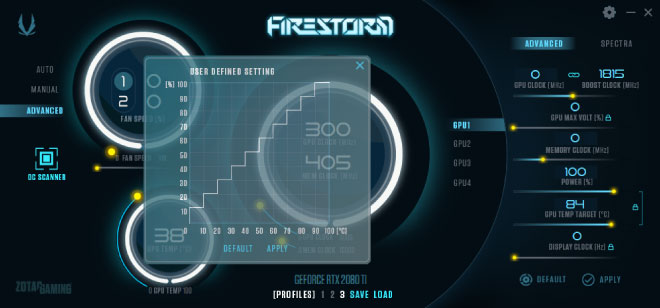
When selecting the ADVANCED tab, a pop up window showing the fan curve will appear. The fan curve, when untouched, will look like a stairway going up from left to right as shown above (keep in mind, this is not the default fan profile of the graphics card.) This is a more advanced version of the MANUAL fan setting with more precision.
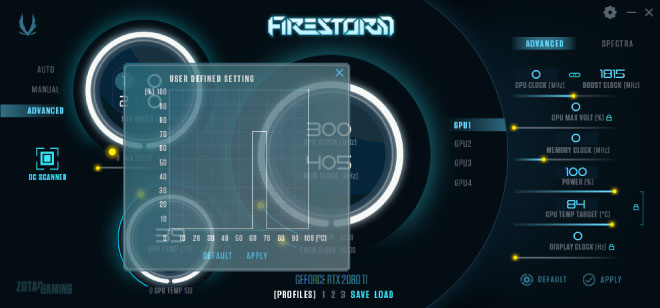
In the custom example profile above (for purposes of this example only), you can see that the fans are set to 0% until the card temperature reaches 60C, where it will kick up to 70% speed. At 100C the fan will be at 100%... we make sure the ZOTAC graphics cards don’t get anywhere this value. For cards with the FREEZE fan stop feature, it will work even though it’s not ideal.
However, keep in mind not all models have the FREEZE fan stop feature. So even if you set a 0 fan speed on a card that doesn’t support it, the fans will only spin at its lowest fan speed that it is capable of. Be sure to click APPLY once you’ve set your fan curve.
OC SCANNER
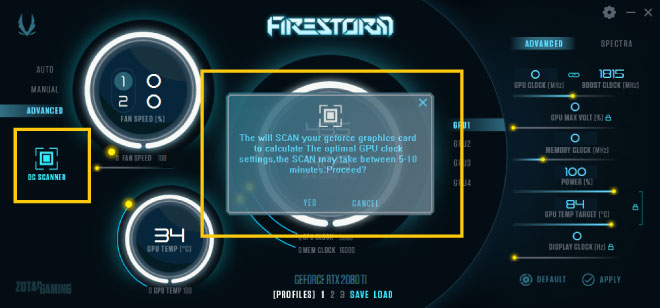
One of the newer functions available to ZOTAC GAMING GeForce RTX series is OC SCANNER. With this new feature, you can extract more performance with just one click. The scanning process can take between 5-10 mins so leave your system alone once it starts. Once the scanning is finished, you’ll have a faster graphics card.
APPLICATION SETTINGS
When you click the Settings icon on the right top (gear icon), you can find the MONITOR, SETTINGS, HELP and INFORMATION buttons.
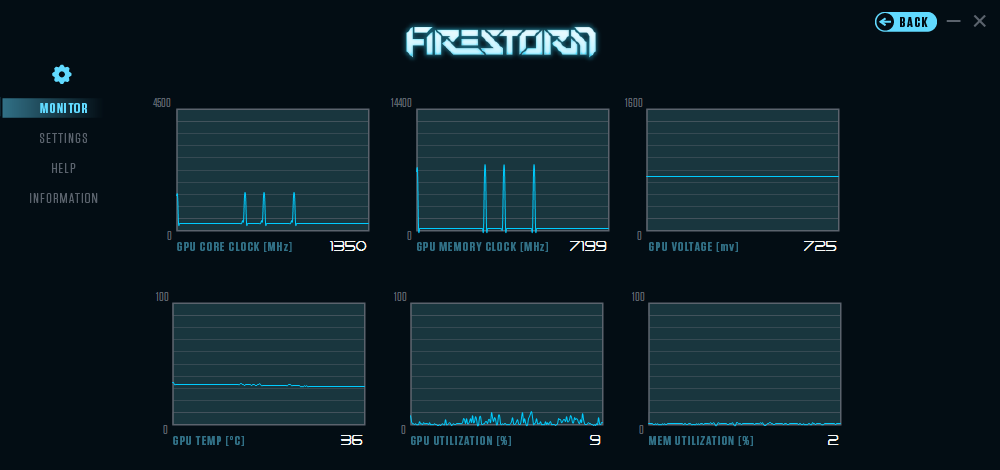
MONITOR will display helpful information regarding the status of your card such as Core speed, Memory Clock speed, Voltage, Temperature, and % Utilization of your GPU and GPU Memory.
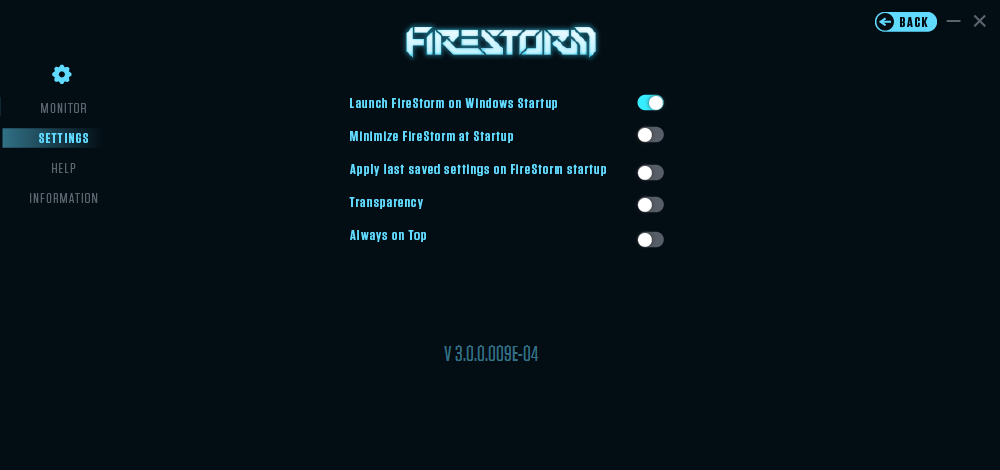
The SETTINGS button lets you choose whether to launch FireStorm on startup, Minimize at startup, Overclock on Startup meaning apply last saved settings on startup of FireStorm, and transparency which changes the opacity of the FireStorm utility to allow you to see behind/thru.
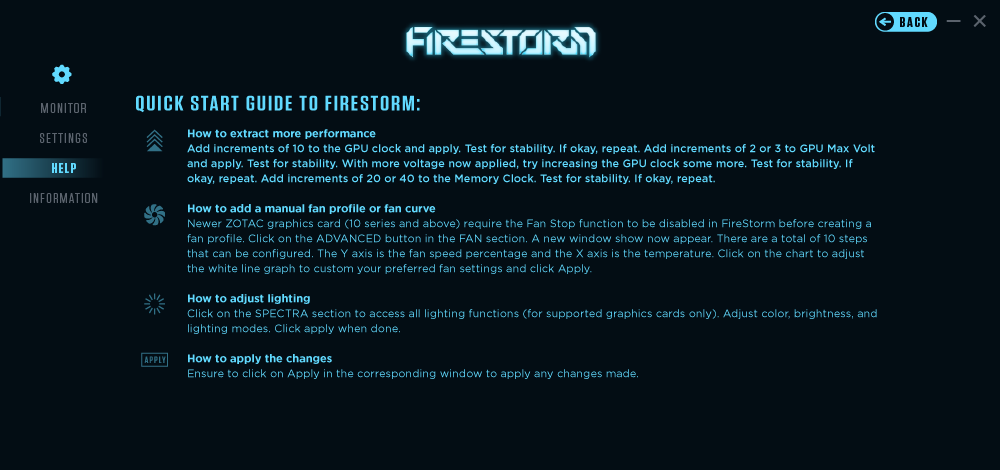
In the HELP menu we include some helpful tips for overclocking your card and controlling the Fan Speed.
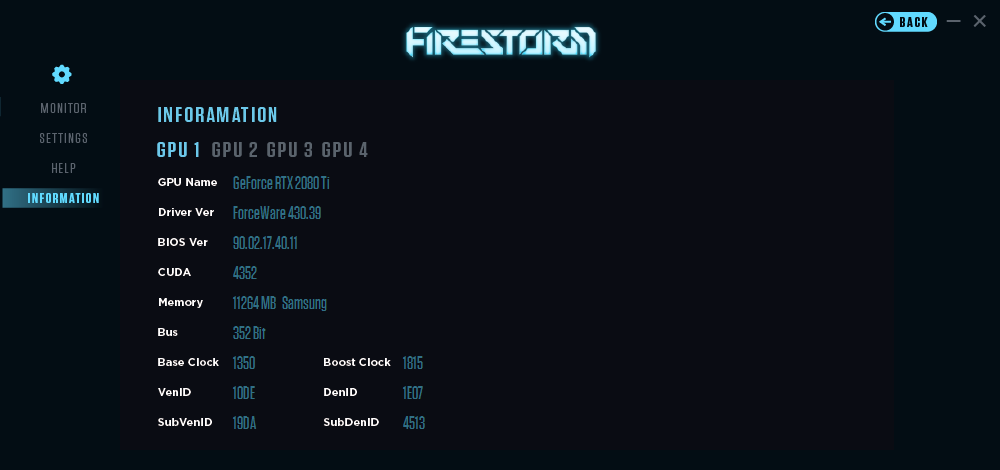
More details are shown in INFORMATION. Check if you have installed the most updated drivers and the version of the BIOS on the graphics card, as well as the specifications of your graphics card.
PLAY WITH SPECTRA LIGHTING
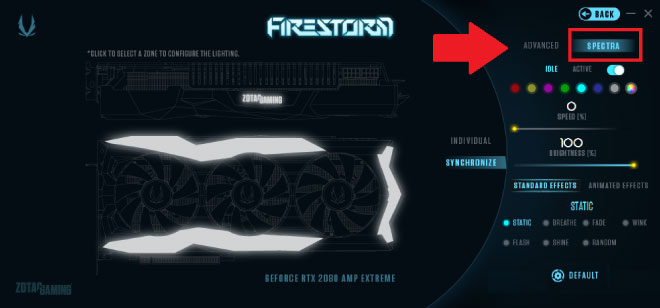
If you are a big fan of RGB lighting on graphics card, you could have a real blast making your own lighting in the SPECTRA section (red box in above image). The advanced LED lighting system allows you to select a customized color scheme for your card through the revamped FireStorm Utility. (please note that the above UI is only visible if you have an RTX AMP Extreme / AMP Extreme Core model)
IDLE AND ACTIVE
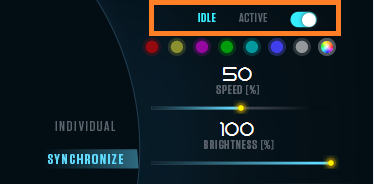
Select either ACTIVE or IDLE on top. It would be best to apply different lighting effects for the two modes so you can visually see if your graphics card is performing or not.
ACTIVE mode – when graphics card is in full action
IDLE mode – when graphics card moves to idle state
COLORS OF YOUR STYLE
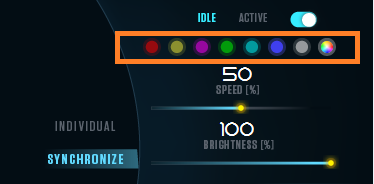
By default, the LEDs are preset to blue, and users will be able to change them to 1 of 7 colors – Red, Yellow, Magenta, Green, Cyan, Blue, White, or customize a unique hue from a wide spectrum of colors.

If you own an RTX AMP Extreme / AMP Extreme Core graphics card, you can even choose identical effects for different lighting zones in INDIVIDUAL mode. Or simpler, you SYNCHRONIZE the lighting for all zones in one click.
Brightness and speed level can also be adjusted whenever you choose a new lighting effect and color.
LIGHTING MODES
In SPECTRA, the effects available are subject to your graphics card's model but you will be able to enjoy all sorts of customization nevertheless. Here are the basic effects you will get:
STATIC - solid single color
BREATHE - fade in and out
STROBE - flash on and off
WAVE - a continuous spectrum of transitioning colors
CYCLE - fade on and off and after each fade out, it will change color
Starting from ZOTAC GAMING GeForce RTX series, AMP Extreme or AMP Extreme Core models are equipped with the more powerful SPECTRA 2.0 Lighting system, which includes 7 STANDARD EFFECTS and 5 ANIMATED EFFECTS. Users will not only enjoy the spectacle on the logo, but will also get much more glow on the enormous light bars on the front.
STANDARD EFFECTS
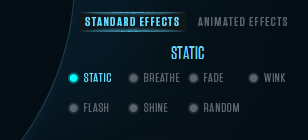
STATIC - solid single color
BREATHE - fades in and out
FADE - a continuous spectrum of transitioning colors
WINK - flashes on and off
FLASH - flashes on and off in red and blue
SHINE - changes brightness to match with music and sounds from system
RANDOM - scattering of sparkles
ANIMATED EFFECTS
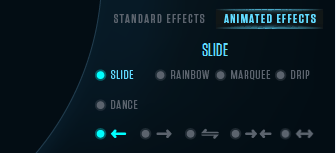
SLIDE - a trail of light that goes in and out
RAINBOW - a continuous wave of rainbow colors
MARQUEE - a stream of light circling around
DRIP - a light bulb circling around
DANCE - pulses to music and sounds from system
Under ANIMATED EFFECTS, the arrows at the bottom allow you to change the direction of how the lights move.
Press DEFAULT if you want to reset everything and start again.
We also included a couple exciting features such as the ability to customize each individual card in an SLI solution, so there's more to play with if you have two NVLink SLI-ready cards.
REMEMBER TO SAVE, LIKE THE WAY YOU PLAY GAMES
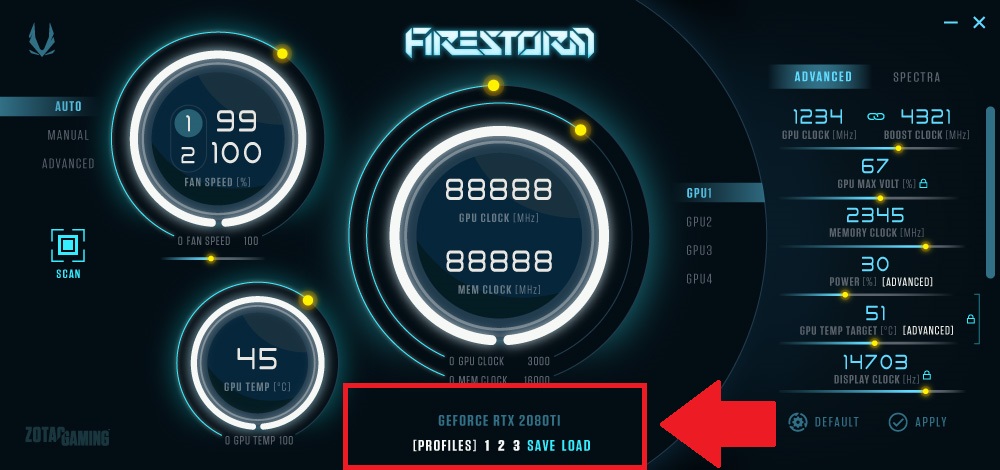
Last but not least, after reading this long article and all the effort you have put to make all these adjustments, well, you would not want to restore your settings all manually again. So before you move on to gaming, don't forget to SAVE your PROFILES at the bottom. Next time when you start up, you can simply press LOAD to get the same preferred settings!
Have fun using FireStorm Utility! And let us know if you need any kind of Support!
